OAuth 2.0 客户端凭证 - Client Credentials

OAuth 2.0 客户端凭证 - Client Credentials

上一篇 OAuth 2.0 的文章中介绍了 OAuth 2.0 标准中颁发令牌的几种模式,这篇文章中将使用 .NET 5 实现客户端凭证模式( Client Credentials ),客户端凭证模式适合于没有 GUI 的命令行应用 CLI或者M2M设备。

分析


客户端凭证模式比较简单,客户端直接通过本机凭证获取令牌,然后使用令牌访问资源服务器。

流程图

调用链

实践


● 开发工具和环境


● 创建授权服务器(Authorization Server)

打开 Windows Terminal,然后输入如下命令创建一个 ASP.NET Core Empty 应用

dotnet new web -n Your-Project-Name

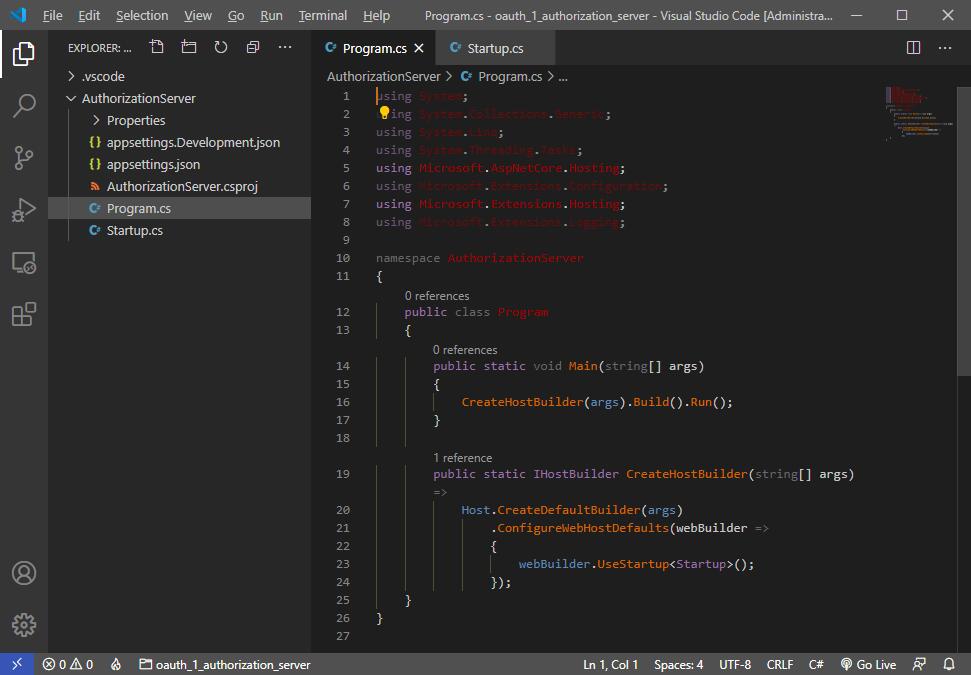
等待创建结束,用 VSCode 打开就可以看到这样一个项目:

紧接着安装 IdentityServer4 运行库,这是一个开源的基于 OpenID ConnectOAuth 2.0 标准的身份验证,单点登录和 API 访问控制框架,输入如下命令安装此运行库

dotnet add package IdentityServer4

等待运行结束,查看一下 Your-Project-Name.csproj,就可以看到已经安装的 IdentityServer4 PackageReference,我们创建一个 IdentityConfig 类用于配置授权服务器应该如何工作,新增一个 IdentityConfig.cs

IdentityConfig.cs
1
2
3
4
5
6
7
8
9
10
11
12
13
14
15
16
17
18
19
20
21
22
23
24
25
26
27
28
29
30
31
32
33
34
35
36
37
38
39
40
41
42
using IdentityServer4.Models;
using System.Collections.Generic;

namespace AuthorizationServer
{
public static class IdentityConfig
{
//API 资源支持和作用域的对应关系
public static IEnumerable<ApiResource> GetApiResources() =>
new ApiResource[]
{
new ApiResource("api1"){Scopes=new[]{"api1"}}
};

//描述提供外部选择的作用域
public static IEnumerable<ApiScope> GetApiScopes() =>
new List<ApiScope>()
{
new ApiScope("api1", "Test Api 1")
};

//定义客户端支持的访问规则和加密方式
public static IEnumerable<Client> GetClients() =>
new List<Client>()
{
new Client()
{
//客户端名称
ClientId = "client1",
//授权模式 - 客户端凭证
AllowedGrantTypes = GrantTypes.ClientCredentials,
//客户端密钥
ClientSecrets = { new Secret("client1Secret".Sha256()) },
//允许访问的作用域
AllowedScopes =
{
"api1"
}
}
};
}
}

接下来配置一下启动管道,把配置注入进去,打开 Program.cs,找到 ConfigureServices 添加如下:

后面重点说一下 AddInMemoryApiResources 这里涉及到的一些知识
Startup.cs -> ConfigureServices
1
2
3
4
5
6
7
8
9
10
11
12
13
14
15
16
17
18
19
20
21
22
public void ConfigureServices(IServiceCollection services)
{
...
var builder = services
//添加 IdentityServer4
.AddIdentityServer()
//添加作用域
.AddInMemoryApiScopes(IdentityConfig.GetApiScopes())
//添加作用域和API资源的对应关系
.AddInMemoryApiResources(IdentityConfig.GetApiResources())
//添加客户端验证配置
.AddInMemoryClients(IdentityConfig.GetClients());

if (_environment.IsDevelopment())
{
//每次启动时为令牌签名创建了一个临时凭证,在生成环境中应该配置一个持久化的凭证
//生产环境应该使用如下方法添加一个持久化的凭证
//builder.AddSigningCredential(SigningCredentials)
builder.AddDeveloperSigningCredential();
}
...
}

启用 IdentityServer4 身份验证

Startup.cs -> Configure
1
2
3
4
5
6
7
public void Configure(IApplicationBuilder app, IWebHostEnvironment env)
{
...
//启用身份认证
app.UseIdentityServer();
...
}

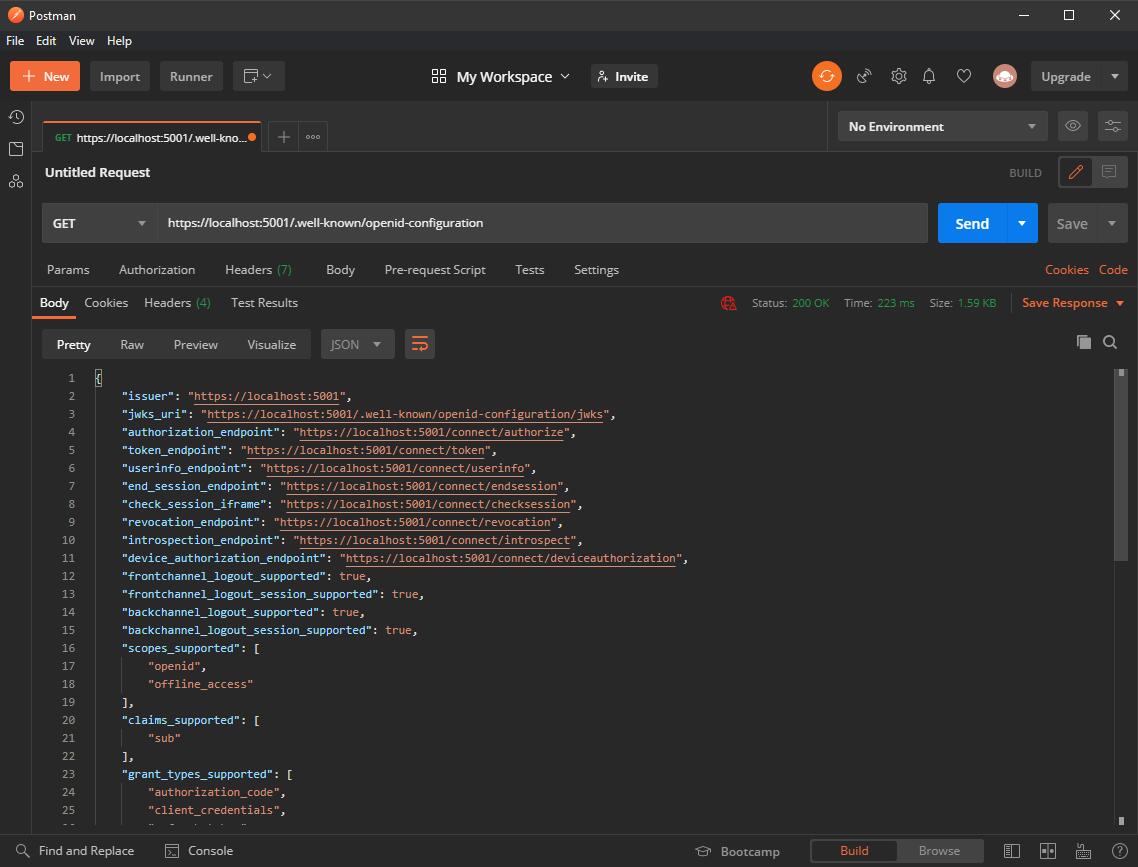
到这里授权服务器就完成了,可以验证一下授权服务器的状态,使用 Postman 请求获取已知的配置,不过在此之前,先要添加 Dotnet Core Https 的开发证书,这样我们请求 https 的时候才不会报 The SSL connection could not be established 的错误,在授权服务器的根目录执行如下命令信任此服务证书:

dotnet dev-certs https --trust

然后在控制台输入运行命令(启动以后会自动生成一个 tempkey.jwk 文件,这是自动创建的临时凭证)

dotnet run

授权服务器启动以后,使用 Postman 发送一个 Get 请求验证一下服务器状态:

https://localhost:5001/.well-known/openid-configuration


● 创建资源服务器(Resource Server)

在授权服务器的同级目录下,创建一个资源服务器,打开 Windows Terminal,然后输入如下命令创建一个 ASP.NET Core Web API 应用

dotnet new webapi -n Your-Project-Name

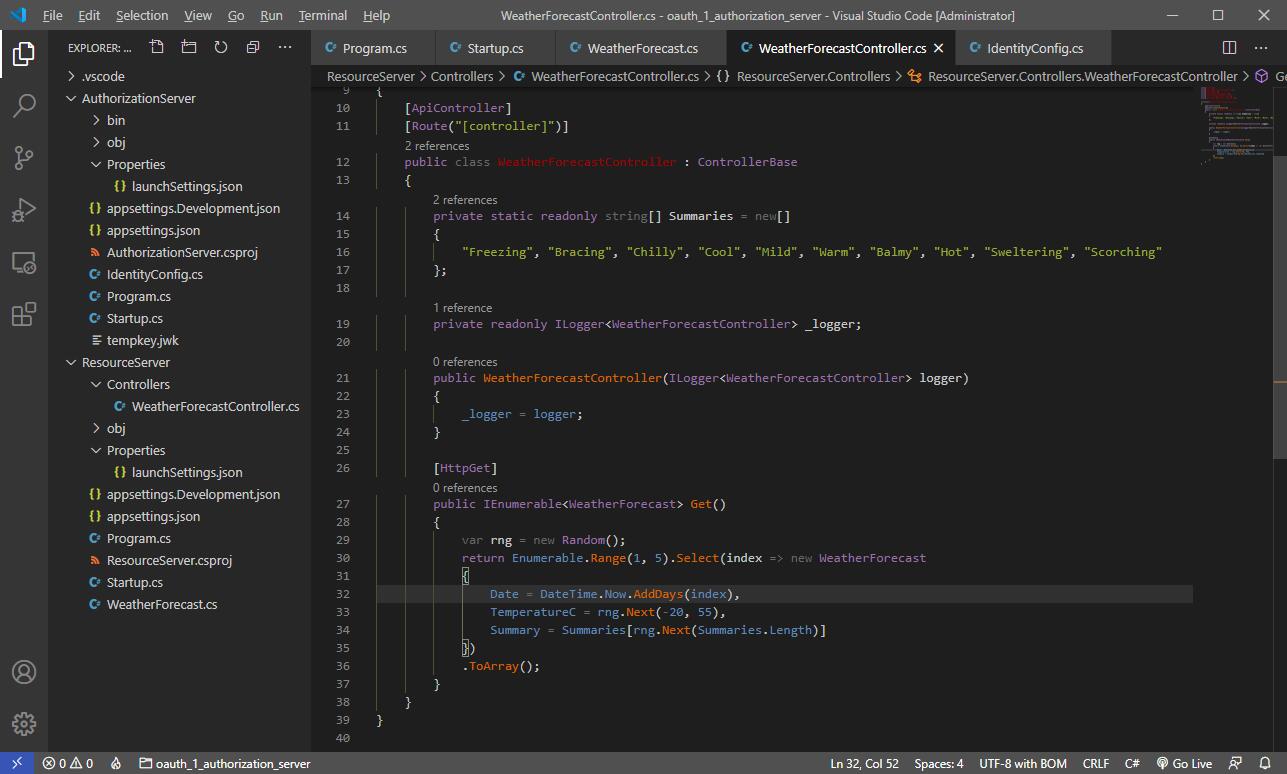
创建结束后,打开项目,会看到模板自动创建了一个默认的 API,这个 API 随机返回一些天气数据。

就用这个 API 来做演示,运行之前先修改一下端口号,因为模板创建出来的都是 https:5001http:5000,等一下需要同时运行授权服务器和资源服务器,不修改的话就会冲突,打开目录文件 Properties -> launchSettings.json,修改 profiles -> ResourceServer -> applicationUrl

1
"applicationUrl": "https://localhost:6001;http://localhost:6000",

我这里修改为了 https:6001http:6000,用命令把服务跑起来,然后用 Postman 请求一下

https://localhost:6001/weatherforecast

请求没有问题,因为还没有注入身份验证,所以 API 是未受保护的状态,不需要任何认证就会响应,接下来开始注入身份认证,先安装 IdentityServer4.AccessTokenValidation 运行库:

dotnet add package IdentityServer4.AccessTokenValidation

然后打开 Startup.cs,在 ConfigureServices 方法中添加如下:

Startup.cs -> ConfigureServices
1
2
3
4
5
6
7
8
9
10
11
12
13
14
15
16
...
services.AddAuthorization();
services
//添加默认的 Authorization 承载头
.AddAuthentication("Bearer")
//添加授权服务器配置
.AddIdentityServerAuthentication(options =>
{
//授权服务器地址
options.Authority = "https://localhost:5001";
//是否必须为 https
options.RequireHttpsMetadata = false;
//对应在授权服务器中设置的 api 名称
options.ApiName = "api1";
});
...

然后在 Configure 方法中启用身份验证(UseAuthentication 必须在 UseAuthorization 之前):

Startup.cs -> Configure
1
2
3
4
...
app.UseAuthentication();
app.UseAuthorization();
...

设置权限,添加 AuthorizeAttribute,需要 Microsoft.AspNetCore.Authorization 此命名空间。

单独为 Action 设置权限

1
2
3
4
5
6
[HttpGet]
[Authorize]
public IEnumerable<WeatherForecast> Get()
{
...
}

也可以为整个 Controller 设置权限

1
2
3
4
[ApiController]
[Route("[controller]")]
[Authorize]
public class WeatherForecastController : ControllerBase { ... }

测试


当测试接口添加了需要认证以后,再次请求接口

https://localhost:6001/weatherforecast

会发现服务返回了 401 Unauthorized,未经授权的状态码,那是因为注入授权服务器以后,Postman 请求并没有去授权服务器拿 Access Token,没有 Access Token 所以资源服务器不会响应请求,正确的步骤是先去请求一个 Access Token,而这个过程就是客户端凭证模式,客户端通过自己的凭证去拿到令牌,然后才能成功的收到响应,我们来操作一下,两个服务都运行起来,打开到刚刚请求 API 的 Postman 页面:

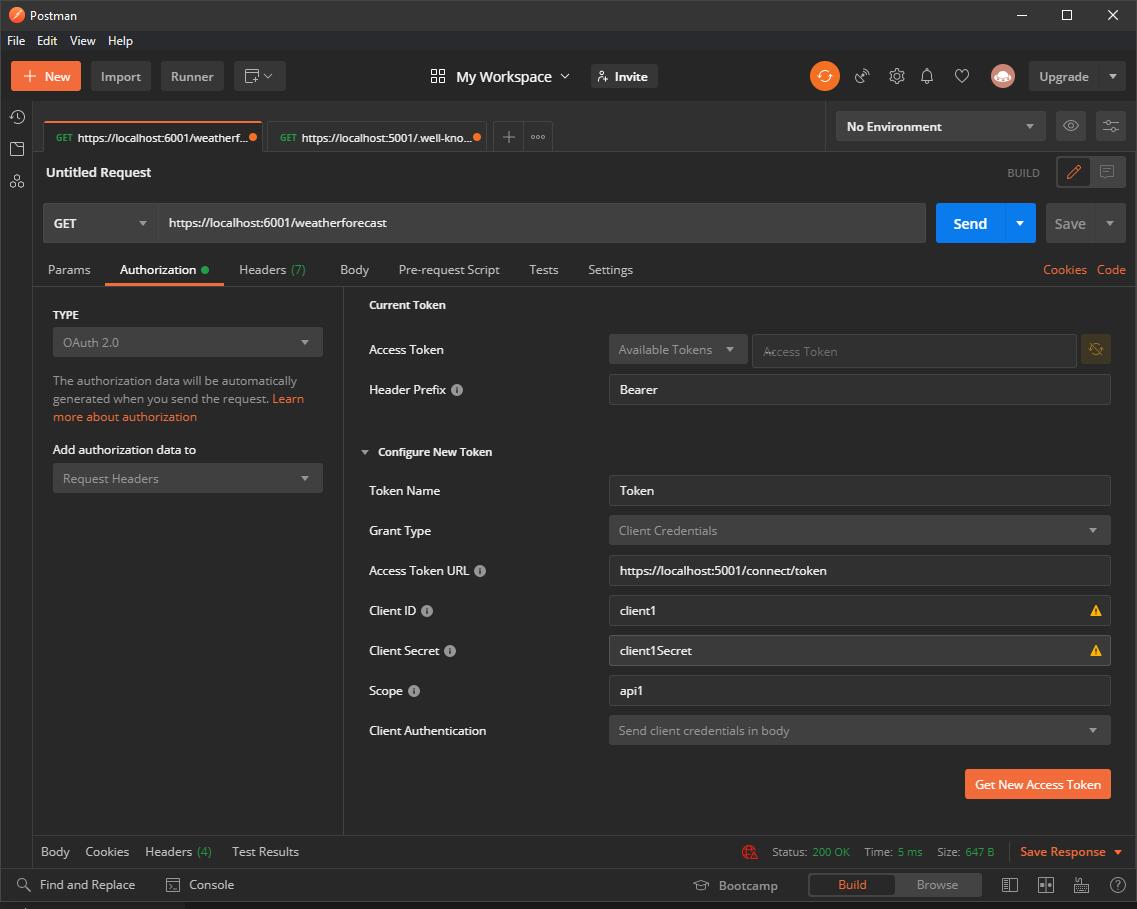
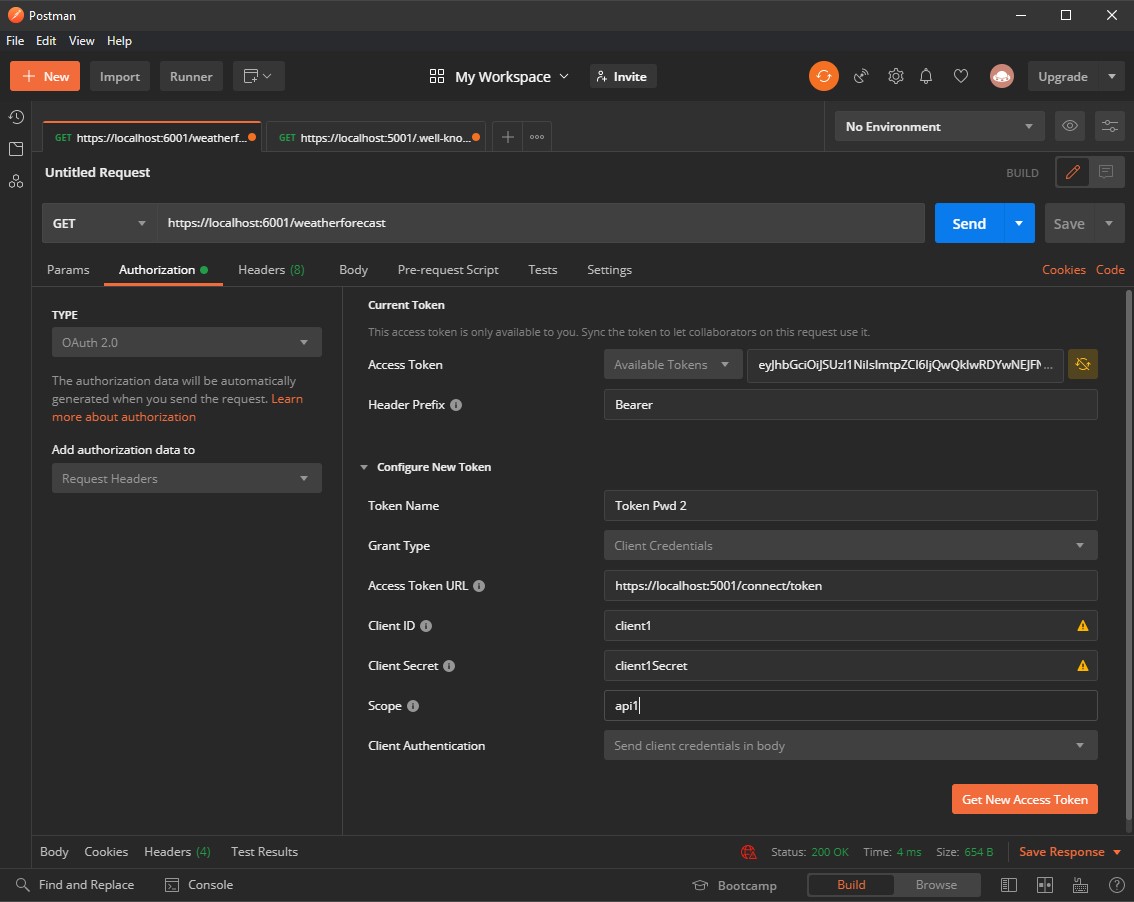
  • 选择 Authorization 标签页
    • 1.选择 Type -> OAuth 2.0
    • 2.选择 Grant Type -> Client Credentials
    • 3.输入 Access Token URL -> https://localhost:5001/connect/token (IdentityServer4 默认令牌路由)
    • 4.输入 Client ID -> client1(对应我们在授权服务器里设置 client1 授权配置)
    • 5.输入 Client Secret -> client1Secret
    • 6.输入 Scope -> api1
    • 7.点击 Get New Access Token

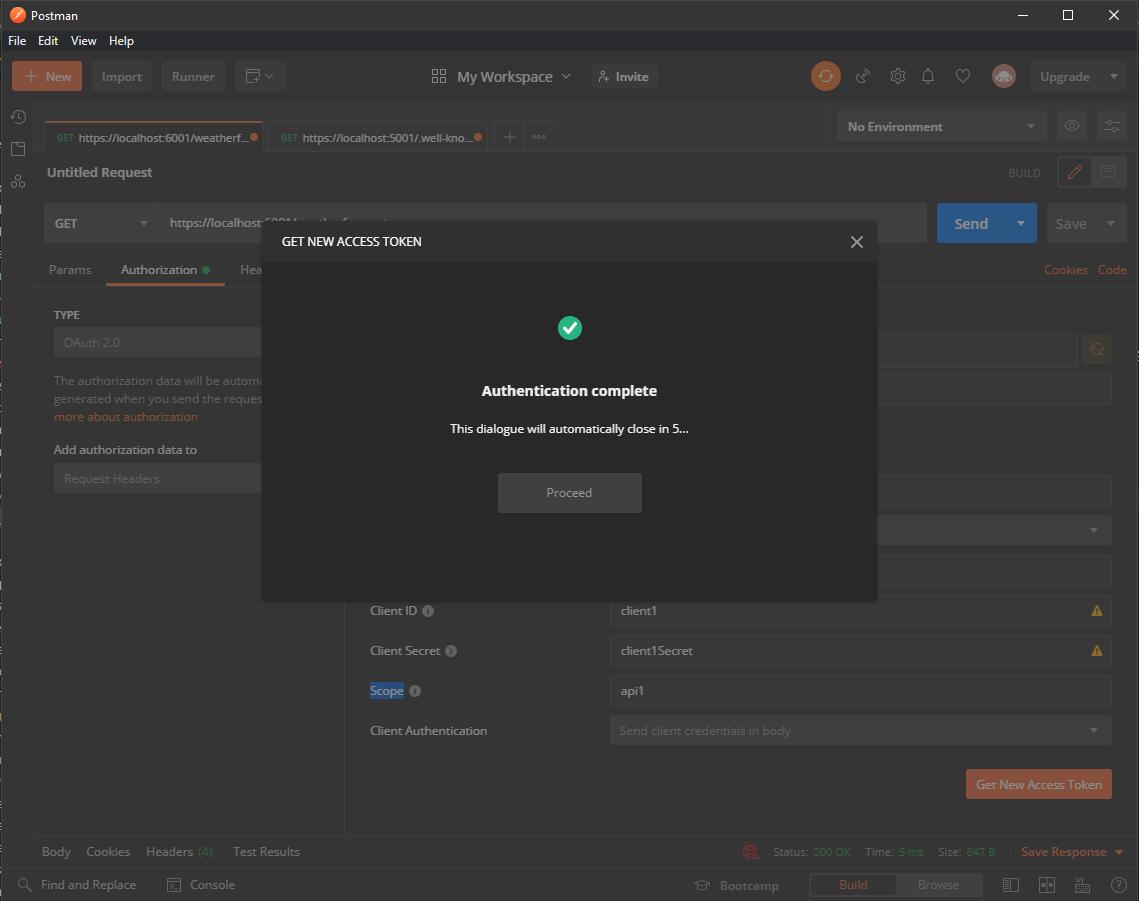
点击以后,Postman 就会获取到 Authorization Token
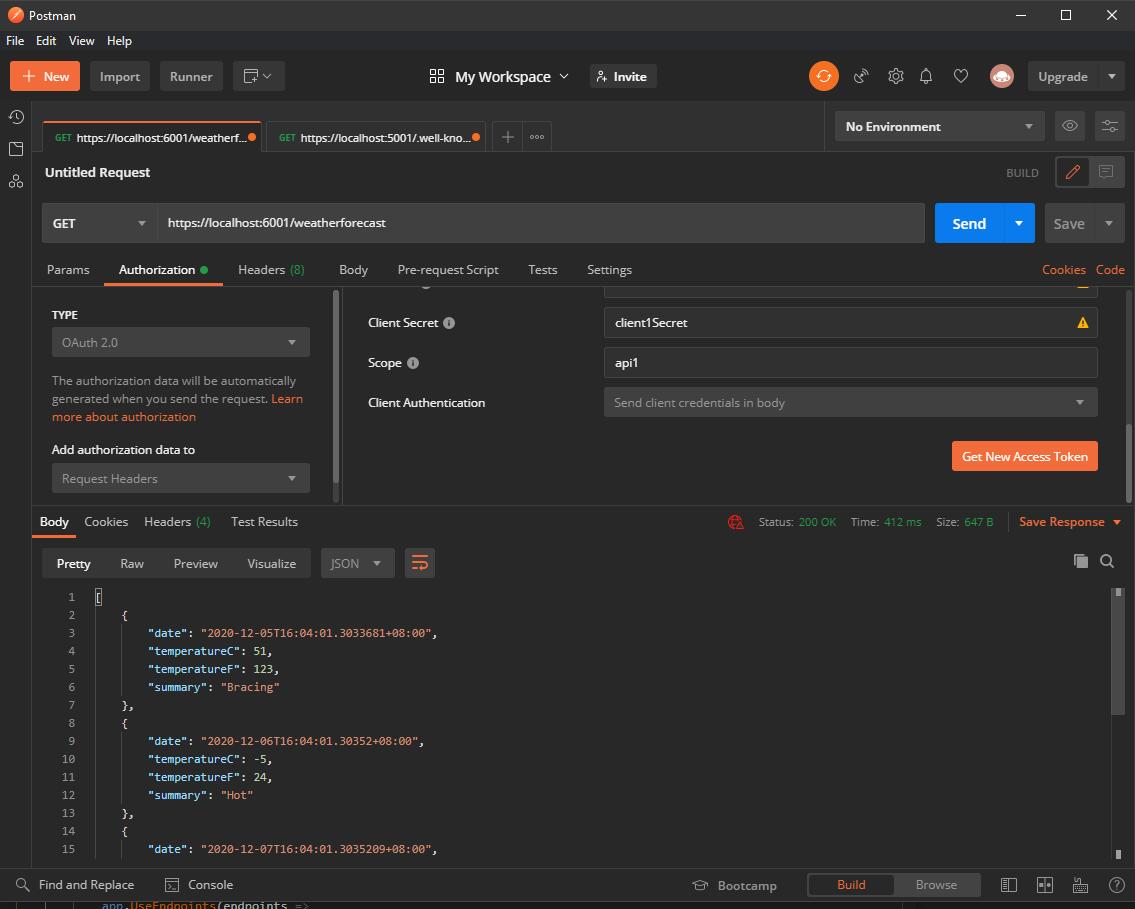
然后应用 Token 到请求头:

再次发送请求,服务器成功响应:

扩展 - Scope 认证


看完上面的示例以后,有同学会抛出疑问了,基于 User 的 ResourceOwnerPassword 认证方式可以配置接口的角色认证,比如管理员角色可以访问管理类型的接口,普通用户角色不可以访问,那这在 IdentityServer4 中的 ClientCredential 模式中如何实现类似的功能,答案就是多客户端+Scope 认证,我们可以配置那些客户端允许访问那些 API Scope,然后在资源服务器上面去配置接口只允许此 Scope 访问,我们看一下如何操作。


● 修改授权服务器

修改授权服务器的 IdentityConfig 配置类如下:

AuthorizationServer -> IdentityConfig.cs
1
2
3
4
5
6
7
8
9
10
11
12
13
14
15
16
17
18
19
20
21
22
23
24
25
26
27
28
29
30
31
32
33
34
35
36
37
38
39
40
41
42
43
44
45
46
47
48
49
50
using IdentityServer4.Models;
using System.Collections.Generic;

namespace AuthorizationServer
{
public static class IdentityConfig
{
public static IEnumerable<ApiResource> GetApiResources() =>
new ApiResource[]
{
//为 api1 增加一个 scope2 资源
new ApiResource("api1"){Scopes=new[]{"api1", "api2"}},
};

public static IEnumerable<ApiScope> GetApiScopes() =>
new List<ApiScope>()
{
new ApiScope("api1", "Test API 1"),
//增加一个 api2 scope作用域
new ApiScope("api2", "Test API 2")
};


public static IEnumerable<Client> GetClients() =>
new List<Client>()
{
new Client()
{
ClientId = "client1",
AllowedGrantTypes = GrantTypes.ClientCredentials,
ClientSecrets = { new Secret("client1Secret".Sha256()) },
AllowedScopes =
{
"api1"
}
},
//增加一个客户端,允许访问 api2 scope
new Client()
{
ClientId = "client2",
AllowedGrantTypes = GrantTypes.ClientCredentials,
ClientSecrets = { new Secret("client2Secret".Sha256()) },
AllowedScopes =
{
"api2"
}
}
};
}
}

然后在资源服务器的 Startup.cs -> ConfigureServices-> AddAuthorization 方法中作如下修改:

Startup.cs -> ConfigureServices-> AddAuthorization
1
2
3
4
5
6
7
8
9
10
...
services.AddAuthorization(options=>
{
//添加一个名称为 scope_client2 的规则,规则内容为:必须满足 scope 为 api2
options.AddPolicy("scope_client2", policy =>
{
policy.RequireClaim("scope", "api2");
});
});
...

最后是修改 AuthorizeAttribute,修改如下:

单独为 Action 设置权限

1
2
3
4
5
6
[HttpGet]
[Authorize("scope_client2")]
public IEnumerable<WeatherForecast> Get()
{
...
}

也可以为整个 Controller 设置权限

1
2
3
4
[ApiController]
[Route("[controller]")]
[Authorize("scope_client2")]
public class WeatherForecastController : ControllerBase { ... }

● 测试

使用 client1 获取一个令牌

然后发送请求,会出现 403 Forbidden

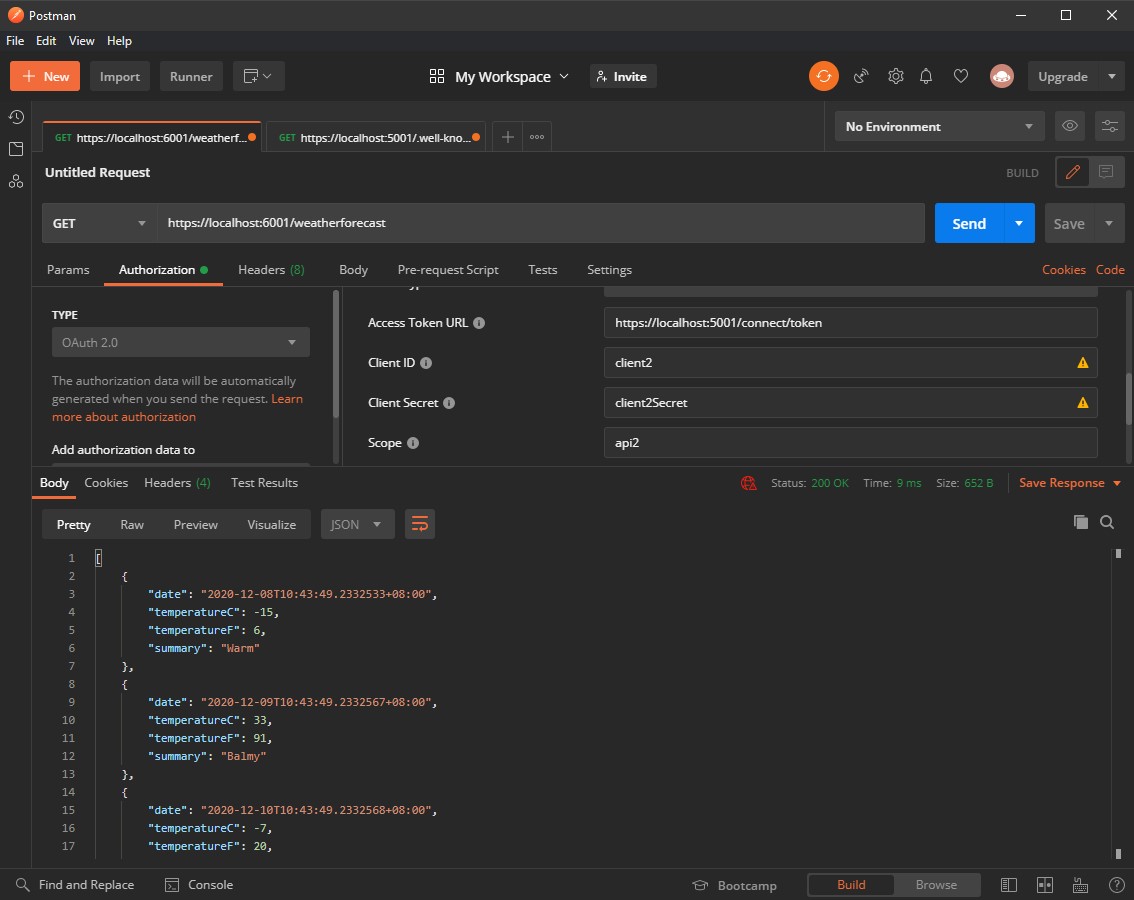
修改为使用 client2 获取一个令牌

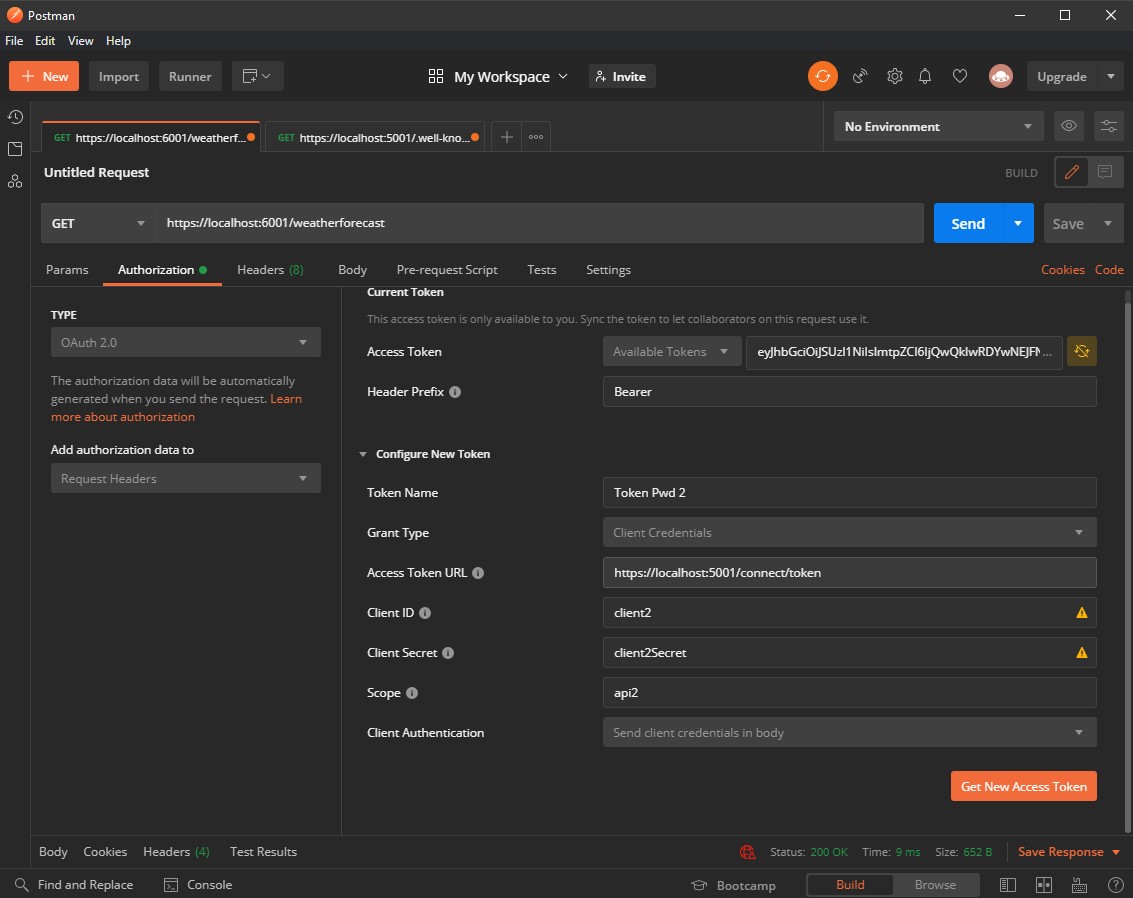
应用 token,然后发送请求,成功响应:

后言


到这里教程就结束了,前面说要重点说一下 AddInMemoryApiResources 这里涉及到的知识,在 IdentityServer4 最新版本中官方拆分了作用域和资源注册,先注册所有作用域(使用 AddInMemoryApiScopes 方法),然后再注册 API 资源(如果需要),然后 API 资源将按名称引用先前注册的范围,这里就是为什么我们在写 IdentityConfig 的时候有一个名为 GetApiResources 的方法,里头进行了这样的定义,然后再通过 AddInMemoryApiResources 添加配置

1
2
3
...
new ApiResource("api1"){Scopes=new[]{"api1"}}
...

因为 IdentityServer4.AccessTokenValidation 运行库默认是要验证 Audience 的,如果没有这个方法和不这样写 API 和 Scopes 之间的关系,那么生成的 Token 中就不会包含 aud 字段,而 IdentityServer4.AccessTokenValidation 默认会去解析 Audience,这样就会引发一个 IDX10214 错误

Bearer was not authenticated. Failure message: IDX10214: Audience validation failed. Audiences: 'System.String'. Did not match: validationParameters.ValidAudience: 'System.String' or validationParameters.ValidAudiences: 'System.String'.

可以做个实验,把 AddInMemoryApiResources 方法去掉,用 postman 请求一下令牌,然后把令牌复制到 jwt.ms,会发现生成的令牌是不会包含 aud 字段:

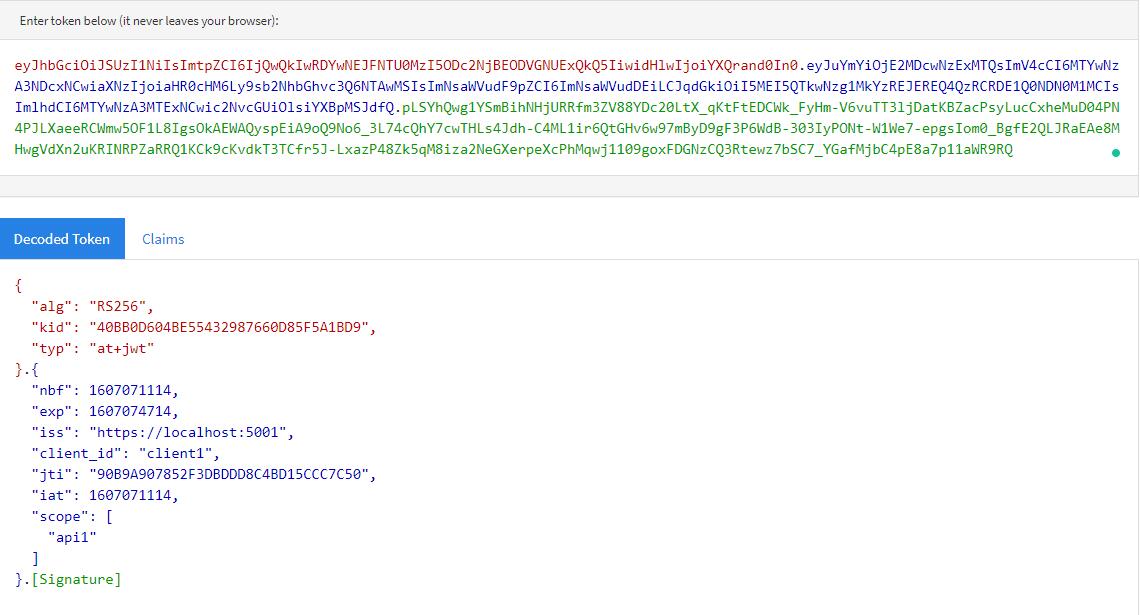
我们用这个令牌去发送请求就会得到上面的 IDX10214 错误,因为我们没有设置,所以获取到的 Audience 是空,我们还原 AddInMemoryApiResources 方法,然后重新请求一个,在复制到 jwt.ms 看一下

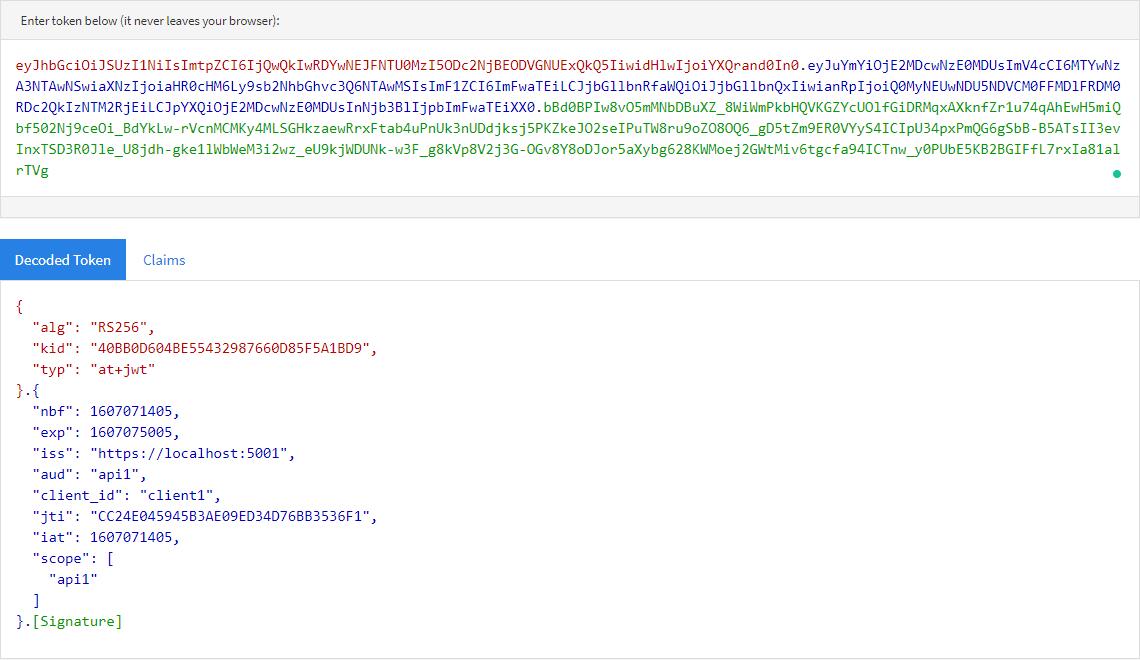
这样生成的令牌才是包含 aud 字段的,这样 IdentityServer4.AccessTokenValidation 去解析的时候才不会报错,重点来了,有没有办法可以不写 ApiResourcesAddInMemoryApiResources 呢?有一个很简单的设置即可,那就是在资源服务器里头设置授权服务器配置的时候,加上

1
2
3
...
options.LegacyAudienceValidation = true;
...

这个设置,那么授权服务器就不会校验 Audience,也不会引发 Audience 解析错误。这样就简单的演示完了,谢谢大家,更深入的知识点大家可以去看 Dotnet Core 和 IdentityServer4 的官方文档。

评论