上一篇 OAuth 2.0 客户端凭证模式 的文章中使用 .NET 5 实现了客户端凭证模式,这篇文章中将将继续使用 .NET 5 实现 OAuth 2.0 隐含式( Implicit Authorization Code Flow 或者 Authorization Code Flow With PKCE ,现在只适合于一些对安全性要求不高的应用。
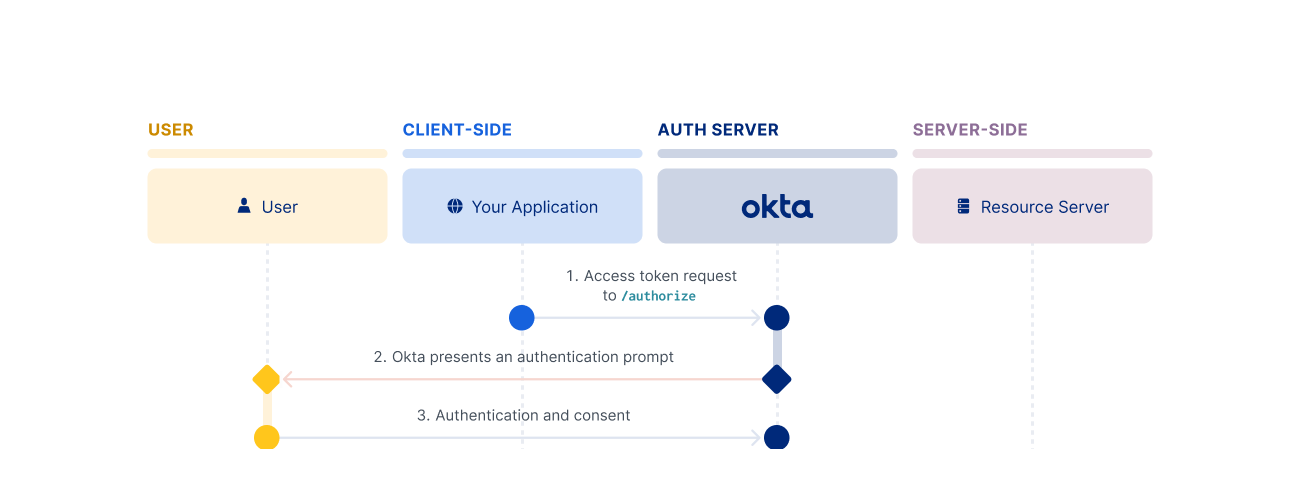
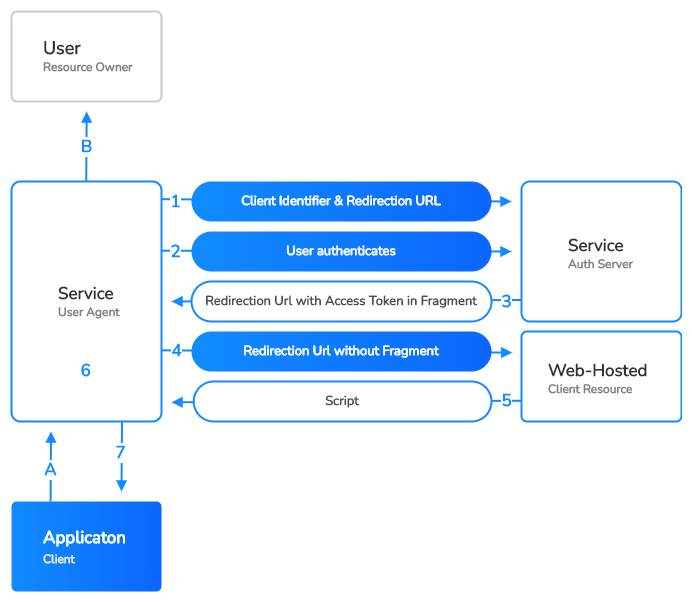
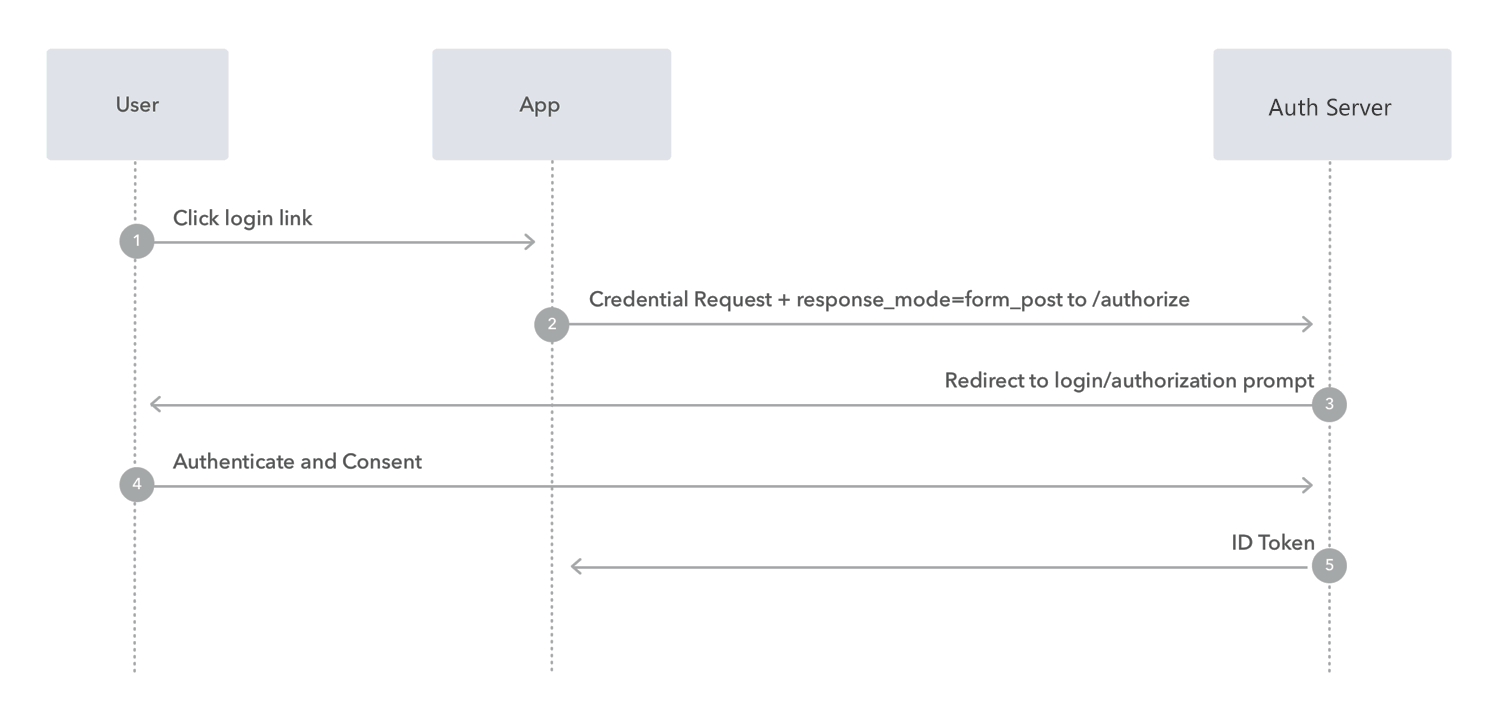
分析 隐含式通过跳转到授权中心 进行用户授权,用户授权结束后,通过 Redirection URL 把 Access Token 返回到客户端托管服务器,客户端托管服务器解析 URL 回调以后传递给客户端,隐含模式适合对安全性要求不高的 SPA(Single Page Application)应用,这种方式省略了授权码(Authorization Code) 这个中间步骤。
实践 ● 开发工具和环境 ● 创建授权服务器(Authorization Server) 打开 Windows Terminal,先安装 IdentityServer4 Template 的项目模板(因为这一章开始需要用到授权界面,为了方便所以直接使用 IdentityServer4 模板,后面会写一章如何实现自己的授权中心认证页面)
dotnet new -i identityserver4.templates
等待模板安装完成,完成以后输入如下命令创建一个具有 GUI 的 Web 授权中心项目
dotnet new is4inmem -n Your-Project-Name
项目创建结束以后,先修改根目录的 Config.cs 类,修改如下:
Config.cs 1 2 3 4 5 6 7 8 9 10 11 12 13 14 15 16 17 18 19 20 21 22 23 24 25 26 27 28 29 30 31 32 33 34 35 36 37 38 39 40 41 42 43 44 45 46 47 48 49 50 51 52 53 54 55 56 57 58 59 60 61 62 63 64 65 66 67 68 69 70 71 72 73 using IdentityServer4.Models;using System.Collections.Generic;using IdentityServer4.Test;namespace AuthorizationServer { public static class Config { public static IEnumerable<IdentityResource> IdentityResources => new IdentityResource[] { new IdentityResources.OpenId(), new IdentityResources.Profile(), }; public static IEnumerable<ApiScope> ApiScopes => new ApiScope[] { new ApiScope("scope1" ) }; public static IEnumerable<Client> Clients => new Client[] { new Client { ClientId = "vue-client" , ClientName = "Vue SPA Client" , ClientUri = "http://localhost:8080" , AllowedGrantTypes = GrantTypes.Implicit, AllowAccessTokensViaBrowser = true , RequireConsent = true , RedirectUris = { "http://localhost:8080/signin-oidc" , "http://localhost:8080/redirect-silent-renew" }, PostLogoutRedirectUris = { "http://localhost:8080/" }, AllowedCorsOrigins = { "http://localhost:8080" }, AllowedScopes = { "openid" , "profile" , "scope1" } } }; public static List<TestUser> TestUsers => new List<TestUser> { new TestUser { SubjectId = "1" , Username = "test" , Password = "123456789" } }; } }
然后修改 Startup.cs,把配置注入进去:
Startup.cs -> ConfigureServices 1 2 3 4 5 6 7 8 9 10 11 12 13 public void ConfigureServices (IServiceCollection services ){ ... builder.AddInMemoryIdentityResources(Config.IdentityResources); builder.AddInMemoryApiScopes(Config.ApiScopes); builder.AddInMemoryClients(Config.Clients); builder.AddTestUsers(Config.TestUsers); ... }
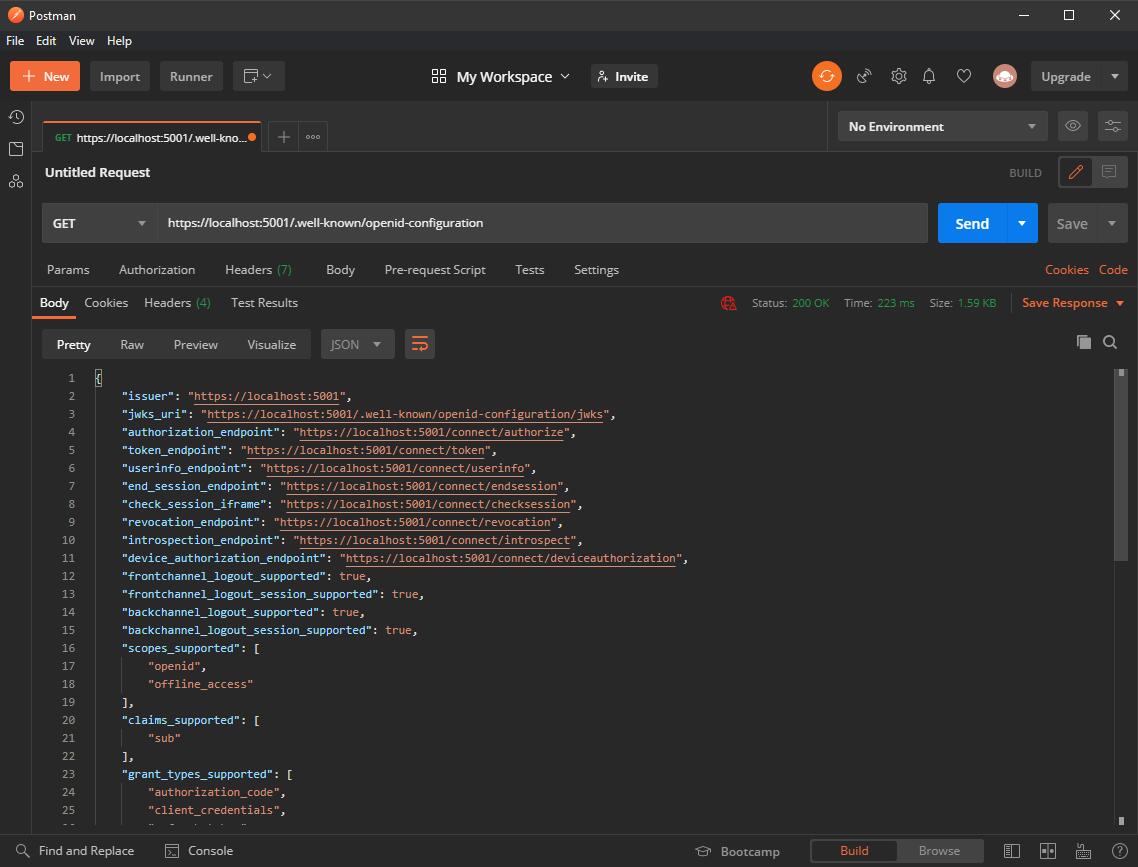
到这里授权服务器就完成了,可以验证一下授权服务器的状态,使用 Postman 请求获取已知的配置,不过在此之前,先要添加 Dotnet Core Https 的开发证书,这样请求 https 的时候才不会报 The SSL connection could not be established 的错误,在授权服务器的根目录执行如下命令信任此服务证书:
dotnet dev-certs https --trust
然后在控制台输入运行命令(启动以后会自动生成一个 tempkey.jwk 文件,这是自动创建的临时凭证)
dotnet run
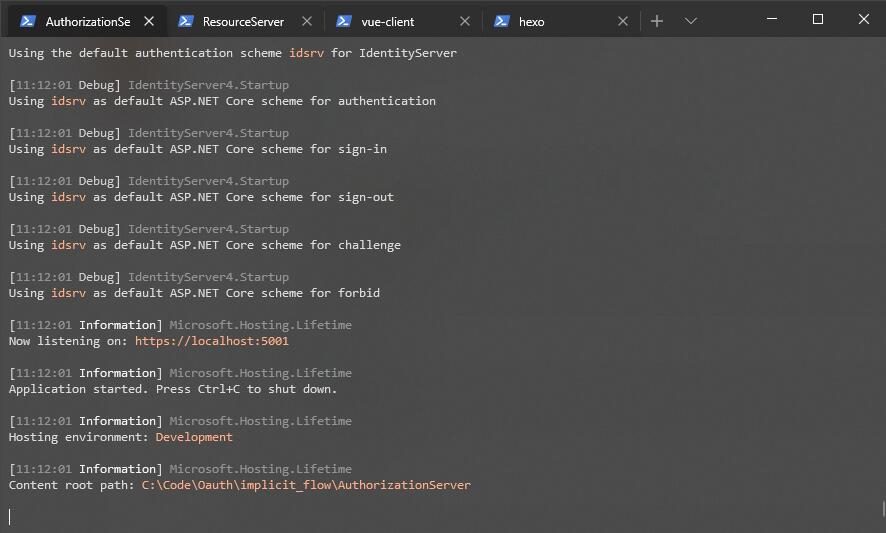
授权服务器启动以后,使用 Postman 发送一个 Get 请求验证一下服务器状态:
● 创建资源服务器(Resource Server) 在授权服务器的同级目录下,创建一个资源服务器,打开 Windows Terminal,然后输入如下命令创建一个 ASP.NET Core Web API 应用
dotnet new webapi -n Your-Project-Name
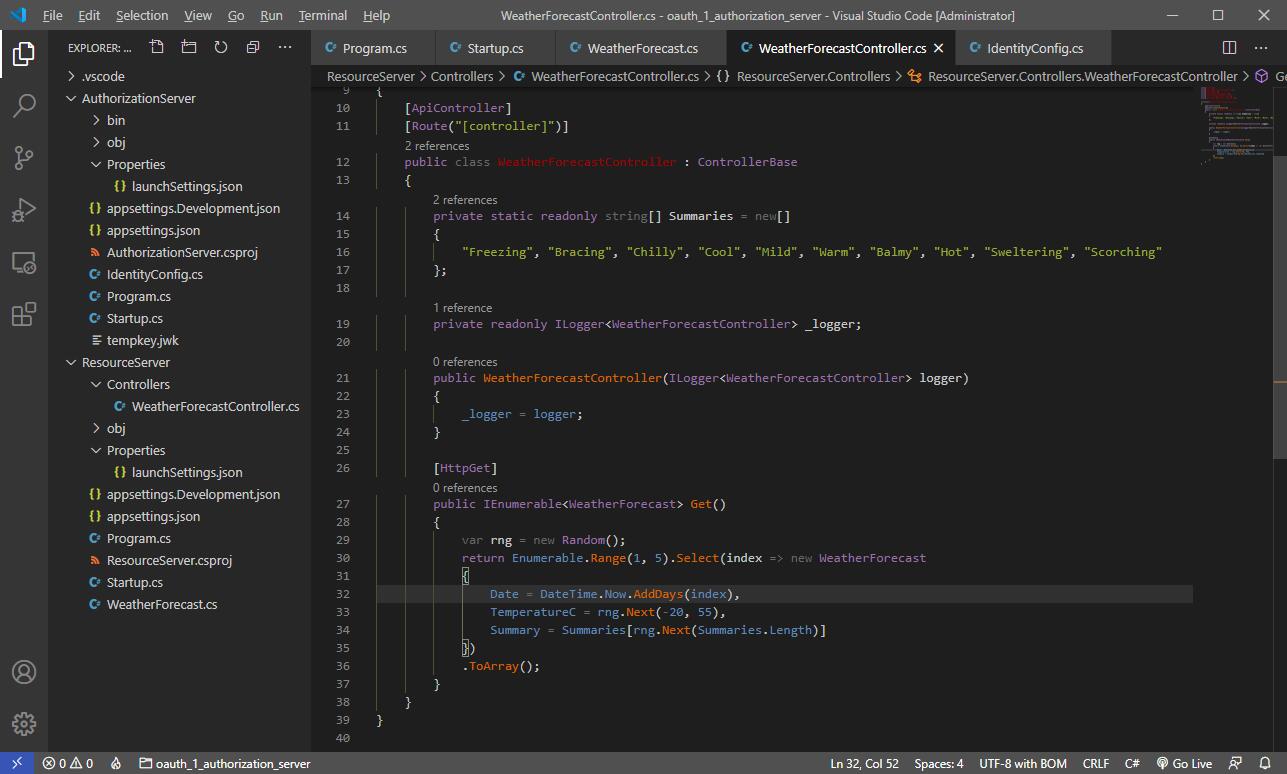
创建结束后,打开项目,会看到模板自动创建了一个默认的 API,这个 API 随机返回一些天气数据。
就用这个 API 来做演示,但是简单修改一下方便后面演示做对比,如下:
WeatherForecastController.cs 1 2 3 4 5 6 7 8 9 10 11 12 13 14 15 16 17 18 19 20 21 22 23 24 using Microsoft.AspNetCore.Mvc;using Microsoft.AspNetCore.Authorization;namespace ResourceServer.Controllers { [ApiController ] [Route("[controller]/{action}" ) ] public class WeatherForecastController : ControllerBase { [HttpGet ] public IActionResult TestPublic () { return Ok(new {data="Hi, this is from public api message" }); } [HttpGet ] [Authorize ] public IActionResult TestProtected () { return Ok(new {data="Hi, this is from protected api message" }); } } }
因为模板创建出来的都是 https:5001 和 http:5000 ,等一下需要同时运行授权服务器和资源服务器,不修改的话就会冲突,打开目录文件 Properties -> launchSettings.json ,修改 profiles -> ResourceServer -> applicationUrl
1 "applicationUrl" : "https://localhost:6001;http://localhost:6000" ,
我这里修改为了 https:6001 和 http:6000 ,用命令把服务跑起来,然后用 Postman 请求一下
请求没有问题,因为还没有注入身份验证,所以 API 是未受保护的状态,不需要任何认证就会响应,接下来开始注入身份认证,打开 Startup.cs ,在 ConfigureServices 方法中添加如下:
Startup.cs -> ConfigureServices 1 2 3 4 5 6 7 8 9 10 11 12 13 14 15 16 17 18 19 20 21 22 23 24 25 26 27 28 29 30 31 32 33 ... services.AddAuthorization(); services.AddAuthentication("Bearer" ) .AddJwtBearer("Bearer" , options => { options.Authority = "https://localhost:5001" ; options.RequireHttpsMetadata = false ; options.Audience = "scope1" ; options.TokenValidationParameters.ClockSkew = TimeSpan.FromMinutes(1 ); options.TokenValidationParameters.RequireExpirationTime = true ; options.TokenValidationParameters.ValidateAudience = false ; }); services.AddCors(options => { options.AddPolicy("VueClientOrigin" , builder => builder.WithOrigins("http://localhost:8080" ) .AllowAnyHeader() .AllowAnyMethod()); }); ...
然后在 Configure 方法中启用身份验证和允许跨域的规则(UseAuthentication 必须在 UseAuthorization 之前):
Startup.cs -> Configure 1 2 3 4 5 ... app.UseCors("VueClientOrigin" ); app.UseAuthentication(); app.UseAuthorization(); ...
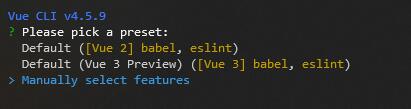
● 创建客户端(Client Application) 打开 Windows Termianl,输入如下命令:
vue create vue-client
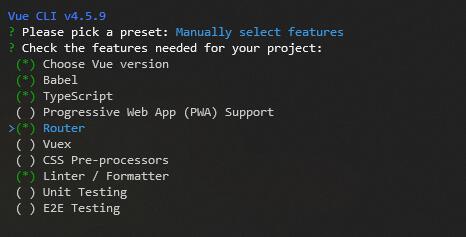
因为用 TypeScript 写,以及 Router 定义路由,所以需要选择这两项
后面的 Vue 模板选项就看个人习惯了,项目创建结束后,安装这几个模块:
使用如下命令进行安装(axios 依赖 Promise 所以不需要额外安装):
yarn add oidc-client axios bootstrap-vue bootstrap-icons-vue -s
安装 bootstrap 的目的是为了让写出来的 Demo 更好看,安装结束后,咱们就开始正式进入客户端的编写,首先创建一个 connect 文件夹,里头创建一个 openid-connect-service.ts 服务用于连接授权服务器。
openid-connect-service.ts 1 2 3 4 5 6 7 8 9 10 11 12 13 14 15 16 17 18 19 20 21 22 23 24 25 26 27 28 29 30 31 32 33 34 35 36 37 38 39 40 41 42 43 44 45 46 47 48 49 50 51 52 53 54 55 56 57 58 59 60 61 62 63 64 65 66 67 68 69 70 71 72 73 74 75 76 77 78 79 80 81 82 83 84 85 86 87 88 89 90 91 92 93 94 95 96 97 98 99 import { UserManager , User } from 'oidc-client' ;const vueBase = 'http://localhost:8080' ;const openIdConnectSettings = { authority : 'https://localhost:5001' , client_id : `vue-client` , redirect_uri : `${vueBase} /signin-oidc` , post_logout_redirect_uri : `${vueBase} /` , silent_redirect_uri : `${vueBase} /redirect-silent-renew` , scope : 'openid profile scope1' , response_type : `id_token token` , automaticSilentRenew : true , }; export class OpenIdConnectService { public static getInstance (): OpenIdConnectService { if (!this .instance ) { this .instance = new OpenIdConnectService (); } return this .instance ; } private static instance : OpenIdConnectService ; private userManager = new UserManager (openIdConnectSettings); private currentUser!: User | undefined ; private constructor ( this .userManager .clearStaleState (); this .userManager .getUser () .then ((user ) => { if (user) { this .currentUser = user; } else { this .currentUser = undefined ; } }) .catch ((err ) => { this .currentUser = undefined ; }); this .userManager .events .addUserLoaded ((user ) => { this .currentUser = user; }); this .userManager .events .addUserUnloaded (() => { this .currentUser = undefined ; }); } get userAvailavle (): boolean { return !!this .currentUser ; } get user (): User { return this .currentUser as User ; } public async triggerSignIn ( await this .userManager .signinRedirect (); } public async handleCallback ( const user : User = await this .userManager .signinRedirectCallback (); this .currentUser = user; } public async handleSilentCallback ( const user : User | undefined = await this .userManager .signinSilentCallback (); this .currentUser = user; } public async triggerSignOut ( await this .userManager .signoutRedirect (); } }
然后在 src 添加一个 services 文件夹,往里面添加一个 resource-service.ts 用于访问测试资源服务器。
resource-service.ts 1 2 3 4 5 6 7 8 9 10 11 12 13 14 15 16 17 18 19 20 21 22 23 24 25 26 27 28 29 30 31 32 33 34 35 36 37 38 39 40 41 42 43 44 45 46 47 48 49 50 import axios, { AxiosResponse , AxiosRequestConfig } from 'axios' ;import { OpenIdConnectService } from '@/connect/openid-connect-service' ;const oidc : OpenIdConnectService = OpenIdConnectService .getInstance ();const baseHost = 'https://localhost:6001' ;export const Apis = { Testpublic : `${baseHost} /WeatherForecast/TestPublic` , Testprotected : `${baseHost} /WeatherForecast/TestProtected` , }; export interface Result { data : string ; } export const PublicApi = (): Promise <Result > => { return new Promise <Result >(async (resolve, reject) => { try { const requestConfig : AxiosRequestConfig = { url : Apis .Testpublic }; const res : AxiosResponse <Result > = await axios (requestConfig); resolve (res.data ); } catch (e) { reject (e); } }); }; export const ProtectedApi = (): Promise <Result > => { return new Promise <Result >(async (resolve, reject) => { try { const requestConfig : AxiosRequestConfig = { url : Apis .Testprotected , headers : { Authorization : GetAuth () }, }; const res : AxiosResponse <Result > = await axios (requestConfig); resolve (res.data ); } catch (e) { reject (e); } }); }; const GetAuth = (): string => let auth : string = `` ; if (oidc.user && oidc.user .token_type && oidc.user .access_token ) { auth = `${oidc.user.token_type} ${oidc.user.access_token} ` ; } return auth; };
授权服务器和资源服务器的 service 就完成了,接下来就是编写 views 了,首先是欢迎界面,在 views 下面添加一个 Welcome.vue 组件
Welcome.vue 1 2 3 4 5 6 7 8 9 10 11 12 13 14 15 16 17 18 19 20 21 22 23 24 25 26 27 28 29 30 31 32 33 34 35 36 37 38 39 40 41 <template> <div > <b-icon font-scale ="8.5" icon ="shield-lock-fill" variant ="danger" class ="mb-4" > </b-icon > <h2 class ="mb-4" > .NET Core Implicit Flow Auth</h2 > <b-button-group vertical class ="w-25" > <b-button variant ="danger" @click ="signiClick" class ="mb-2" > Sign-ni</b-button > <b-button variant ="success" @click ="publicClick" class ="mb-2" > Call Public API</b-button > <b-button @click ="protectedClick" class ="mb-2" > Call Protected API</b-button > </b-button-group > </div > </template> <script lang ="ts" > import { Component , Vue , Inject } from 'vue-property-decorator' ; import { OpenIdConnectService } from '@/connect/openid-connect-service' ; import { PublicApi , ProtectedApi } from '@/services/resource-service' ; @Component export default class Welcome extends Vue { @Inject () private oidc!: OpenIdConnectService ; private signiClick ( console .log ('oidc' , this .oidc .userAvailavle , this .oidc ); if (!this .oidc .userAvailavle ) { this .oidc .triggerSignIn (); } else { this .$router .push ({ path : '/home' }); } } private async publicClick ( const resultData = await PublicApi (); console .log (resultData); } private async protectedClick ( const resultData = await ProtectedApi (); console .log (resultData); } } </script >
然后是 SigninOidc.vue 组件,这个是登陆成功后跳转回调的页面(也就是比如某些网站用 QQ 登陆以后会出现登陆成功,正在为您跳转回原站点)
SigninOidc.vue 1 2 3 4 5 6 7 8 9 10 11 12 13 14 15 16 17 18 <template> <div > <h1 > Login Succuess, callback, waiting</h1 > </div > </template> <script lang ="ts" > import { Component , Vue , Inject } from 'vue-property-decorator' ; import { OpenIdConnectService } from '@/connect/openid-connect-service' ; @Component export default class SigninOidc extends Vue { @Inject () private oidc!: OpenIdConnectService ; public async created ( await this .oidc .handleCallback (); this .$router .push ({ path : '/home' }); } } </script >
然后是 RedirectSilentRenew.vue 组件,这个组件是自动刷新令牌用的
RedirectSilentRenew.vue 1 2 3 4 5 6 7 8 9 10 11 12 13 14 15 16 17 <template> <div > </div > </template> <script lang ="ts" > import { Component , Vue , Inject } from 'vue-property-decorator' ; import { OpenIdConnectService } from '@/connect/openid-connect-service' ; @Component export default class RedirectSilentRenew extends Vue { @Inject () private oidc!: OpenIdConnectService ; public created ( this .oidc .handleSilentCallback (); } } </script >
最后修改 Home.vue 组件,这个是登陆成功以后重定向页面导航过来的目标页面。
Home.vue 1 2 3 4 5 6 7 8 9 10 11 12 13 14 15 16 17 18 19 20 21 22 23 24 25 26 27 28 29 30 31 32 33 34 35 36 37 38 39 40 41 42 <template> <div > <b-icon font-scale ="8.5" icon ="patch-check-fll" variant ="success" class ="mb-4" > </b-icon > <h2 class ="mb-4" > Login Successfully</h2 > <b-button-group vertical class ="w-25" > <b-button variant ="danger" @click ="signOutClick" class ="mb-2" > Sign-out</b-button > <b-button variant ="success" @click ="publicClick" class ="mb-2" > Call Public API</b-button > <b-button variant ="success" @click ="protectedClick" class ="mb-2" > Call Protected API</b-button > </b-button-group > </div > </template> <script lang ="ts" > import { Component , Vue , Inject } from 'vue-property-decorator' ; import { OpenIdConnectService } from '@/connect/openid-connect-service' ; import { PublicApi , ProtectedApi } from '@/services/resource-service' ; @Component export default class Welcome extends Vue { @Inject () private oidc!: OpenIdConnectService ; private async created ( if (!this .oidc .userAvailavle ) { await this .oidc .triggerSignIn (); } } private async signOutClick ( await this .oidc .triggerSignOut (); } private async publicClick ( const resultData = await PublicApi (); console .log (resultData); } private async protectedClick ( const resultData = await ProtectedApi (); console .log (resultData); } } </script >
这样所有的视图组件就写完了,接下来修改一下 App.vue 完善一下样式以及授权服务器的初始化
App.vue 1 2 3 4 5 6 7 8 9 10 11 12 13 14 15 16 17 18 19 20 21 22 23 24 25 26 27 28 29 30 31 32 33 34 35 36 <template> <div id ="main" > <div id ="app" > <router-view /> </div > </div > </template> <script lang ="ts" > import { Component , Vue , Provide } from 'vue-property-decorator' ; import { OpenIdConnectService } from './connect/openid-connect-service' ; @Component export default class App extends Vue { @Provide () private oidc : OpenIdConnectService = OpenIdConnectService .getInstance (); } </script > <style > html , body { height : 100% ; } #main { height : 100% ; width : 100% ; display : table; } #app { display : table-cell; height : 100% ; vertical-align : middle; text-align : center; } </style >
然后修改一下路由,找到 router 文件夹下的 index.ts,修改成如下:
index.ts 1 2 3 4 5 6 7 8 9 10 11 12 13 14 15 16 17 18 19 20 21 22 23 24 25 26 27 28 29 30 31 32 33 34 import Vue from 'vue' ;import VueRouter , { RouteConfig } from 'vue-router' ;Vue .use (VueRouter );const routes : Array <RouteConfig > = [ { path : '/' , name : 'welcome' , component : () => import ('../views/Welcome.vue' ), }, { path : '/home' , name : 'home' , component : () => import ('../views/Home.vue' ), }, { path : '/signin-oidc' , name : 'signin-oidc' , component : () => import ('../views/SigninOidc.vue' ), }, { path : '/redirect-silent-renew' , name : 'redirect-silent-renew' , component : () => import ('../views/RedirectSilentRenew.vue' ), }, ]; const router = new VueRouter ({ mode : 'history' , routes, }); export default router;
最后在 main.ts 中启用 bootstrap 和 bootstrap-icons 组件,以及装饰路由器
main.ts 1 2 3 4 5 6 7 8 9 10 11 12 13 14 15 import Vue from 'vue' ;import App from './App.vue' ;import router from './router' ;import { BootstrapVue , BootstrapVueIcons } from 'bootstrap-vue' ;import 'bootstrap/dist/css/bootstrap.css' ;import 'bootstrap-vue/dist/bootstrap-vue.css' ;Vue .use (BootstrapVue );Vue .use (BootstrapVueIcons );Vue .config .productionTip = false ;new Vue ({ router, render : (h ) => h (App ), }).$mount('#app' );
最后修改一下 ESlint 的语法校验 .eslintrc.js,把大小写驼峰检测关掉,以及缩进,要不然编译会出现错误,这是因为 oidc-client 的配置属性使用了 小写+下划线。
.eslintrc.js 1 2 3 4 5 6 7 8 9 10 module .exports = { ... rules : { ... 'camelcase' : [2 , {'properties' : 'always' }], 'no-mixed-spaces-and-tabs' : 'off' ... } ... }
到这里客户端也编写完成了,接下来就是测试了。
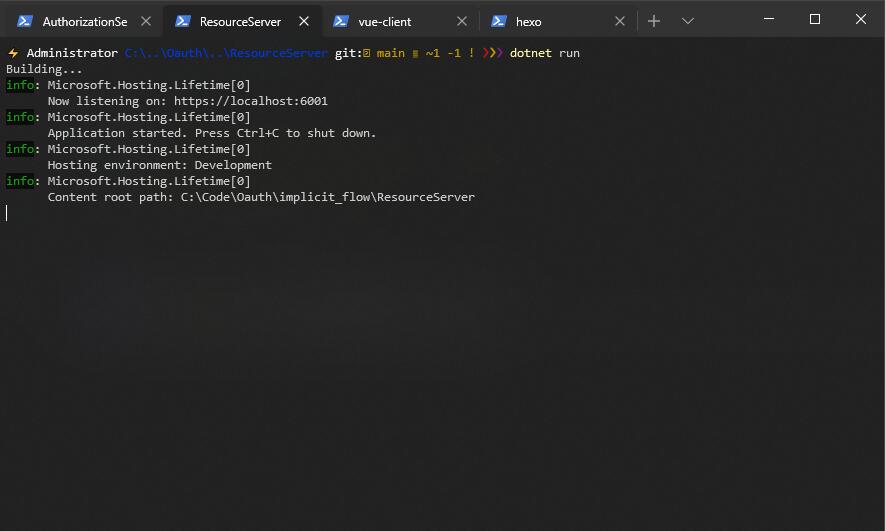
测试 首先把三个项目都运行起来(授权服务器,资源服务器,客户端):
授权服务器和资源服务器运行命令
dotnet run
客户端运行命令
yarn serve
然后访问一下客户端
可以看到,不登录之前没有授权保护的 Public API 是可以请求通过的,但是 Protected API 因为有授权保护,所以不登陆之前都是返回 401,登陆以后就可以请求通过了,登陆的时候会跳转到授权中心页面进行授权,用户同意 vue client 访问以后,就会跳转回我们的客户端页面,如果通过 URL 直接访问受保护的路由,也会触发自动登录。